Skyline Loop Trail Guide: 10 Reasons It’s WA’s Best Day Hike

Planning to hike the Skyline Loop Trail at Mount Rainier National Park?
I’ve hiked this trail in spring, summer, and fall, and its panoramic mountain views make it Washington’s best day hike—and my personal favorite.
I’ll never forget my first glimpse of the Tatoosh Mountains across the meadows. That was the moment I fell in love with this park.
But is it worth doing the entire Skyline Loop? How hard is it? What makes it so special?
➥ In this guide, I answer all of these questions and share 10 reasons why hiking the Skyline Trail belongs on your bucket list. I also provide practical tips to help you show up ready for the adventure.
Let’s go!
Skyline Loop Trail Guide
Plan your adventure with the travel logistics, trail information, and tips below.
Travel Logistics:
- Location: Paradise, Mount Rainier’s most popular visitor area
- Closest Towns: Ashford is my go-to base, with several lodging options and restaurants, including BaseCamp Bar & Grill. If it’s fully booked, nearby Elbe is a good backup.
- Closest Park Entrance: The Nisqually Entrance is the closest and busiest entrance. A National Park Pass is required, but no additional permit is needed for this hike.
- Parking Tips: Before reaching the Henry M. Jackson Visitor Center, you’ll pass the lower parking lot on your left. If it’s filling up, park there instead of circling the upper lot. There’s also a third lot, and roadside parking along Paradise Road when the lots fill.
- Amenities: Restrooms near the Paradise Ranger Station open earlier than those at the visitor center. You’ll also find restrooms and the Tatoosh Cafe inside Paradise Inn. I usually grab a double shot of espresso before starting the climb.

Trail Information:
- Length & Elevation: About 5.8 miles with 1,700 feet of elevation gain. Beginners and kids can hike it with the right gear, water, and food. I start slow to let my body adjust to the incline.
- Accessibility: The trail begins paved before transitioning to dirt and rock. Expect plenty of rock steps.
- Route Options: Should you hike the Skyline Loop clockwise or counter-clockwise? Both are excellent. I share why I prefer clockwise below.
- Shortcuts Available: With so many intersecting trails, you can shorten or extend your hike. I share options below, including the Golden Gate Trail shortcut and what you miss if you take it.
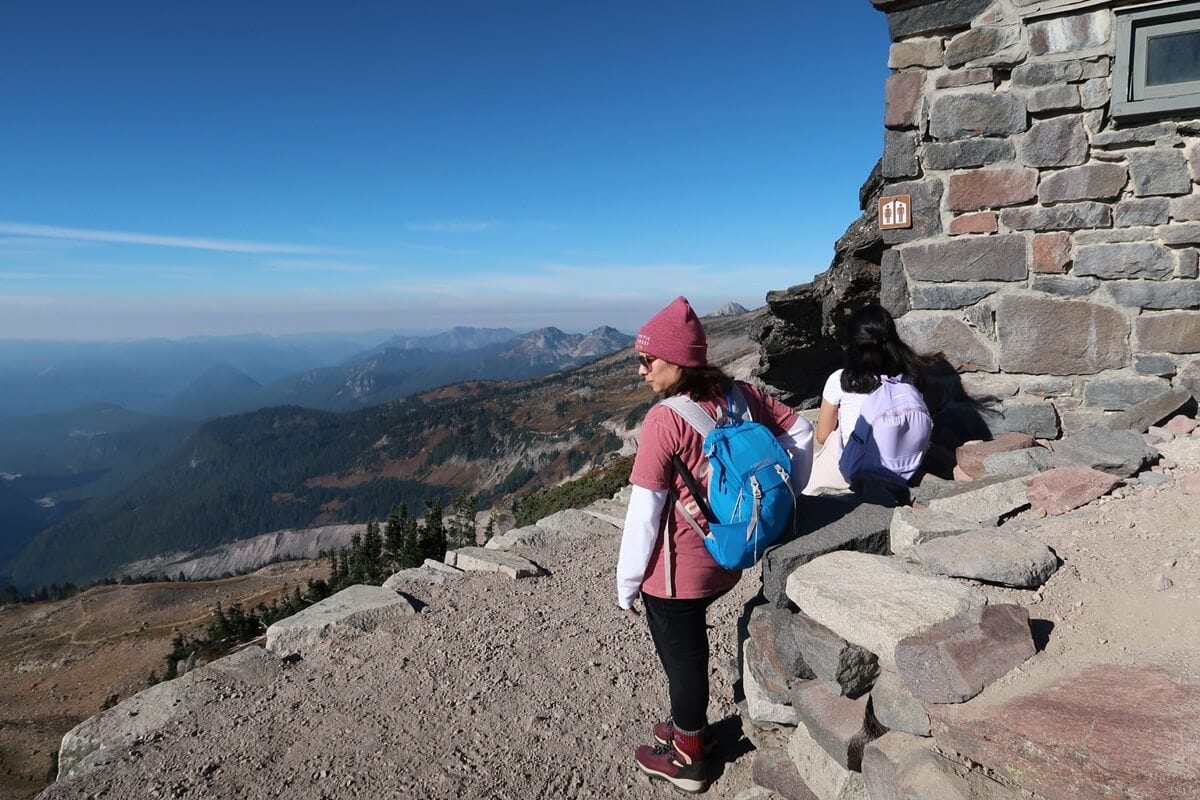
- Pit Toilet: Look for a stone structure at Panorama Point, the pinnacle of the trail.
Trail Tips:
- Weather Forecast: Hike when “the Mountain is out,” local speak for Rainier’s visibility. I check Mountain Forecast before every trip.
- Gear Essentials: Trekking poles help to navigate gravelly terrain and steps. You’ll be glad you brought them on the descent. Snow often lingers into late July, making proper footwear essential.
- Water & Food: Bring 2 to 3 liters of water per person and a mix of sweet and savory snacks. I always pack more food than I think I’ll need.
- Keep Wildlife Wild: You may see marmots, squirrels, deer, and maybe even a mountain goat. Give wildlife plenty of space and never feed them.
10 Reasons to Hike Mount Rainier’s Skyline Trail
The Skyline Trail offers a journey through Mount Rainier National Park’s iconic landscapes, with each section showcasing unique features, ensuring there’s no monotony.
This article considers hiking the trail clockwise.
1. Stunning Views of Mount Rainier
Starting clockwise, Mount Rainier is the star of this hike, filling your views with its massive presence.
If it’s your first time hiking this trail, choose a clear day for the best mountain views. You’ll be so awestruck that you might not notice how much you’re climbing.
The hike begins through a subalpine landscape on a paved trail, where evergreen trees and rolling meadows frame your early glimpses of “the Mountain,” what locals call Rainier.

At .83 miles, you’ll stand at your first unimpeded panoramic view Rainier. A little farther at 1.22 miles, you’ll get another stunning, unobstructed view, giving you a closer look at Rainier’s glaciers.
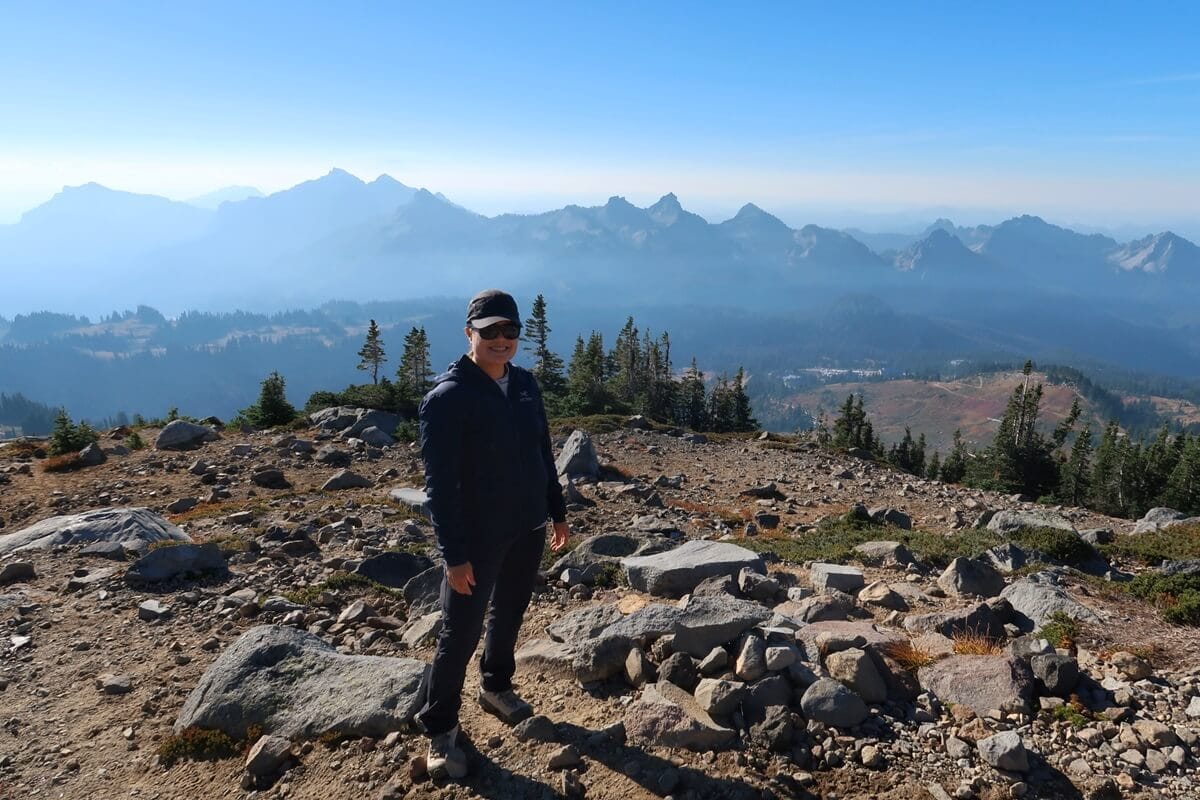
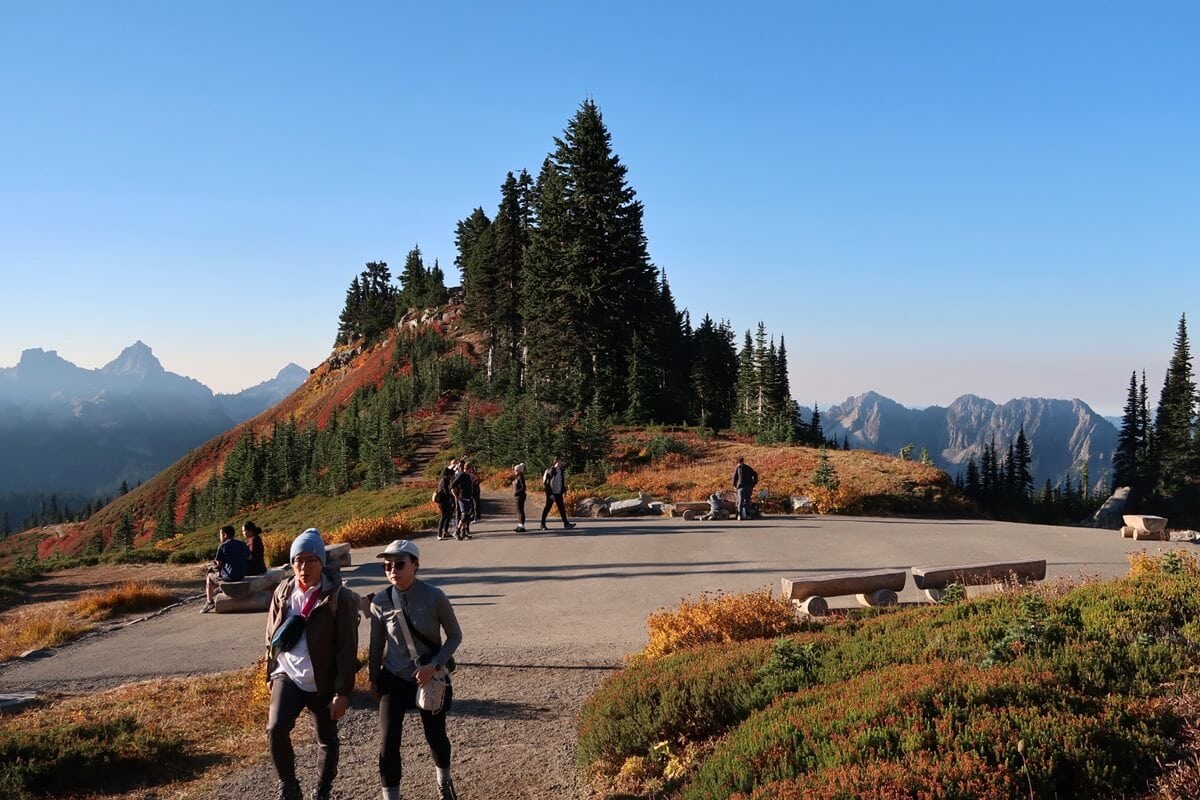
The pinnacle of the trail is Panorama Point, 6,800 feet high, an incredible reward for all the steep climbing you’ll have accomplished to reach it. I discuss Panorama Point in a section below.
As you descend clockwise, the Mountain comes back into view many times. In the autumn, the landscape below it is ablaze in fiery fall color.
Hike the Skyline Loop Trail clockwise to maximize views of Mount Rainier.
While some online accounts state that you’ll see the Mountain for the longest time hiking it clockwise, my personal experience and trusted guidebook indicate otherwise.
You’ll enjoy breathtaking views of Rainier throughout the trail, regardless of the direction you choose.
Reasons to Hike Clockwise:
➥ Frequent views of the Mountain early on, with Rainier in front of you longer.
➥ Tackle most of the steep elevation gain in the early stages.
➥ Avoid the most trafficked parts of Paradise’s trail system by completing them earlier in the day.
Reasons to Hike Counterclockwise:
➥ A more gradual incline that’s easier on the legs.
➥ A quieter start to the hike, especially early in the morning, with fewer crowds around Edith Creek and Myrtle Falls.
➥ Skip a short uphill section near the end of the loop when you may be more tired.
You really can’t go wrong, either way!
2. Paradise Meadows
The Paradise meadows are world famous for their wildflowers and fall color.
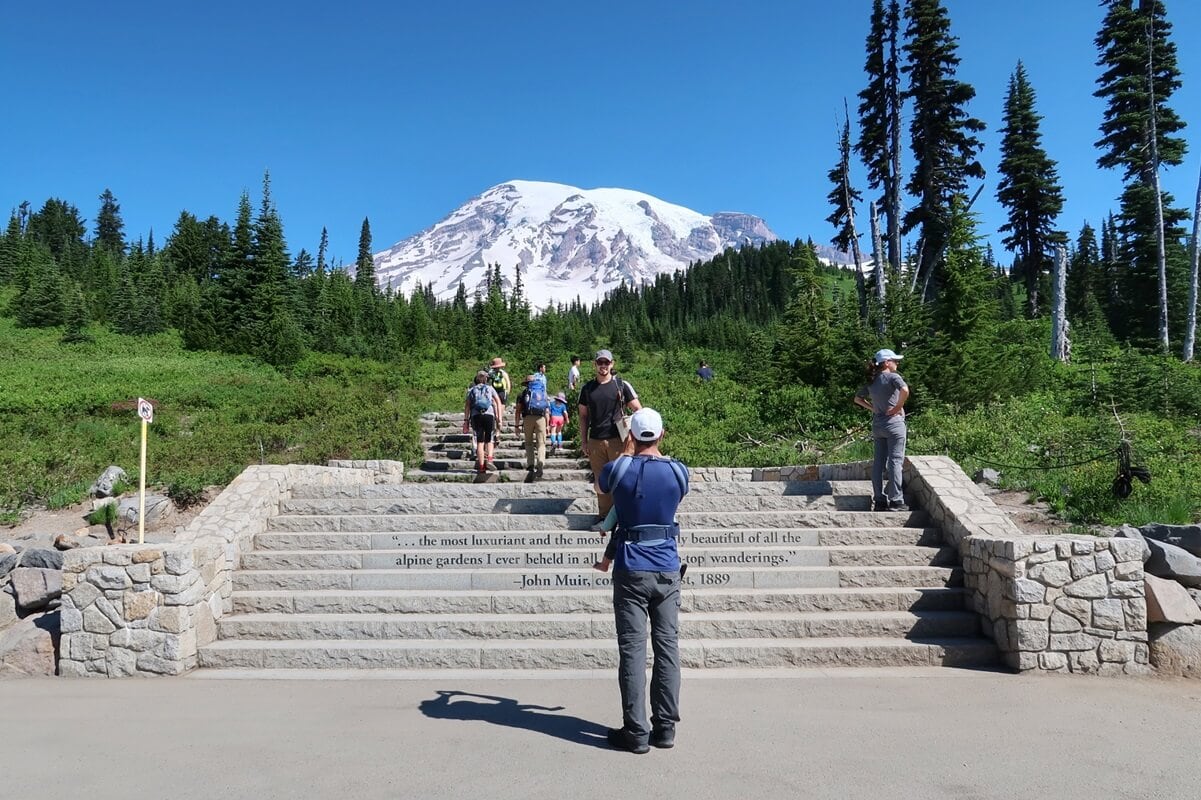
Naturalist John Muir, whose words are carved into the Muir Steps at the start of the trail, called them the “most extravagantly beautiful of all the alpine gardens.”
I remember the first time I saw a field of avalanche lilies here, blanketing the rolling slopes. I was hooked on wildflowers after that experience, and I’ve visited Mount Rainier every summer since in my attempt to catch them at peak bloom.
The best time to see wildflowers is from mid-July through mid-August, although the timing of specific blooms varies each year.
Check the NPS website to see what’s in bloom.
While wildflowers surround the visitor center and roads leading to Paradise, you’ll find the most awe-inspiring displays as you climb higher along the Skyline Trail. These meadows are one of Mount Rainier National Park’s most stunning features.
In autumn, Paradise meadows put on a spectacular display of fall color, with crimson huckleberry leaves, yellows, and oranges creating a striking contrast to evergreen trees.

3. Wildlife Encounters
On my first Skyline Trail hike on a late July weekend, I heard the sound of a marmot’s high-pitched whistle before spotting one.
Crowds often gather near Marmot Hill, just before Glacier Vista, to watch these furry woodchuck-like creatures sunbathing on rocks or munching on plants.
Never feed wildlife. Their digestive systems can’t handle human food, and relying on handouts puts their survival at risk.
On the last prime hiking weekend in October, I saw two black-tailed deer, a handful of squirrels, a Canada Jay, and the goat that lives at Panorama Point, according to a ranger. But I didn’t see any marmots.
Another ranger explained that the recent cold weather might have driven them into hiding.
Marmots hibernate from October to April, but with Paradise trails buried in snow until early July, mid-summer to early fall are the best times to see them.
Are there bears at Mount Rainier?
Yes, the national park is home to black bears, but their fur can range from black to brown, making their name misleading.
Black bears occasionally wander into the meadows near the Skyline Trail to graze on berries, and rangers actively monitor their movement.
Learn bear safety tips.
4. Glacier Views & Vistas
Mount Rainier boasts 25 named glaciers, making it the most glaciated mountain in the lower 48.
From the Skyline Trail, you’ll enjoy incredible views of the Nisqually Glacier, the most studied glacier in the park.
At roughly 1.1 miles, the trail intersects with the Glacier Vista Trail. This short detour is worth it for a close-up of the Nisqually Glacier, allowing you to marvel at its immense scale and blue-tinged edges.

Facing the opposite direction, there’s nothing quite like seeing layers of mountains stretching endlessly into the distance. This remarkable 360-degree view includes the Tatoosh Range, Paradise meadows and valleys, and Mount Rainier dramatically emerging from the earth.
On my fall hike, I was initially disappointed by the lack of snow on the peaks and surrounding areas. However, I soon realized how much more prominent the glaciers appeared without it.
Late summer and early fall visits offer an excellent opportunity to observe the movement of the Nisqually Glacier’s slow, directional flow.
5. Diverse Terrain & Geology
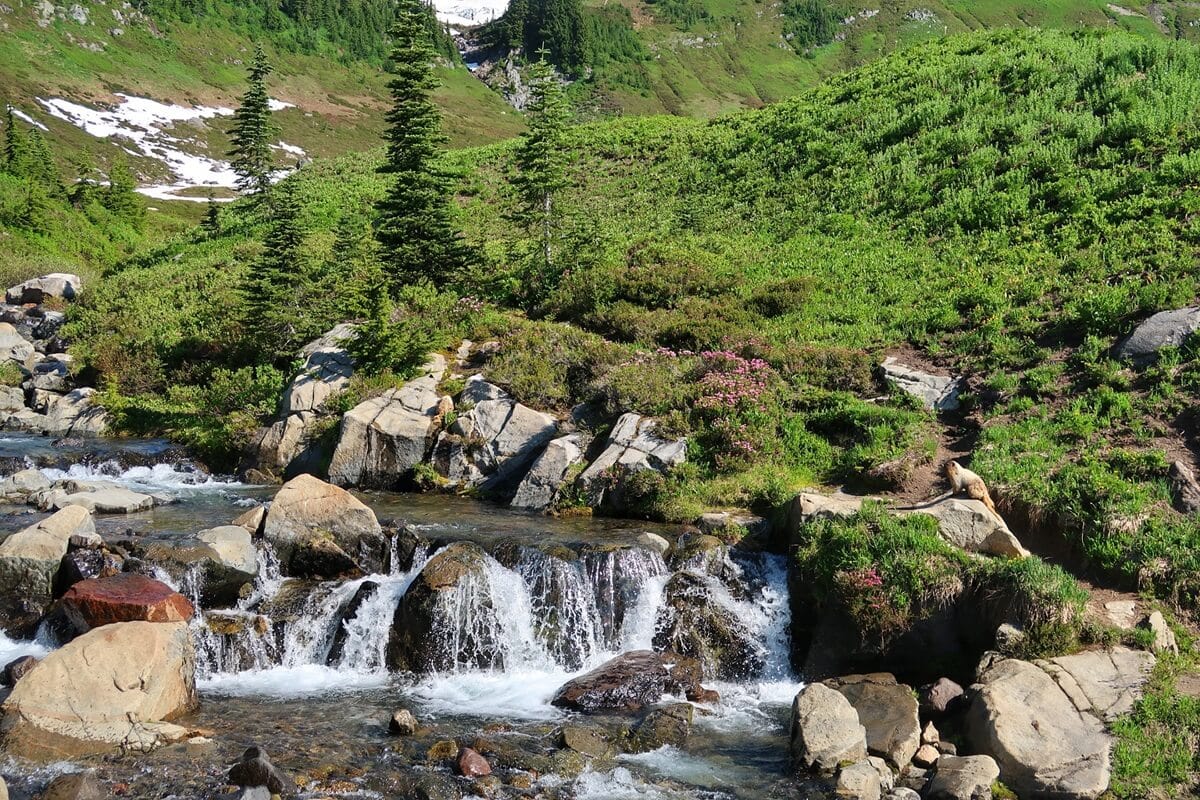
The Skyline Trail begins on a paved surface with lush meadows and evergreen trees lining the trail. As you ascend, a creek runs parallel to the trail, fed by glacier meltwater.
After you pass Glacier Vista, the landscape changes dramatically. The trail climbs through rugged and rocky terrain, offering an extraordinary glimpse of Rainier’s geological history.
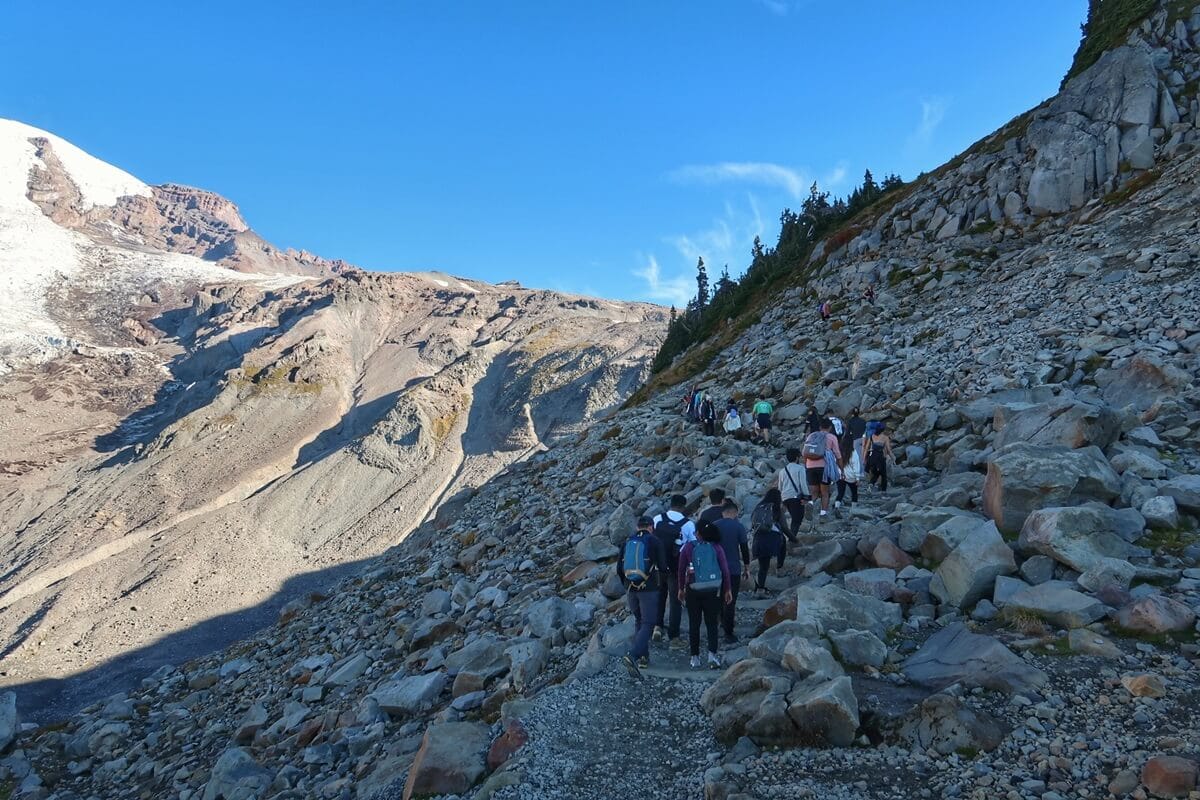
One of my favorite views comes just before turning right toward Panorama Point after starting up this section. Mount Rainier seems to rise from the folds of an impressive, barren valley carved by the Nisqually Glacier during the Pleistocene ice age, roughly 2.6 million to 11,000 years ago.
The deep, contoured ridges shaped by ancient glacial activity are incredible.
I’m always surprised that more people don’t stop in awe, but the trail doesn’t have a viewing area here, so it makes sense to continue to avoid congestion on the trail.
Still, it’s worth briefly pausing to appreciate the dramatic terrain and its geological significance.
6. Panorama Point: The Skyline Trail’s Pinnacle Viewpoint
You’ll hike roughly 1300 feet of elevation to get to Panorama Point, where the views are iconic. Even before you arrive, the peaks of the Tatoosh Range across Paradise’s subalpine landscape are mesmerizing.
I think of Panorama Point as having upper and lower viewing areas. A vault toilet between these two areas has the most incredible view you’ll ever see waiting in a bathroom line.
Lower Panorama Point
Lower Panorama Point features excellent views of the Tatoosh Range, Mount Adams, Mount St Helens, and Mount Hood, but you’ll see only the top of the Mountain if you turn around.
It’s an excellent spot for photos, resting, eating lunch, and lingering to enjoy the views.
Upper Panorama Point
It’s about another 150 feet of climbing to upper Panorama Point. From here, you’ll find the breathtaking 360-degree views this area is aptly named for, featuring Rainier and its glaciers, Paradise meadows below, and surrounding ranges, valleys, and volcanoes in the distance.
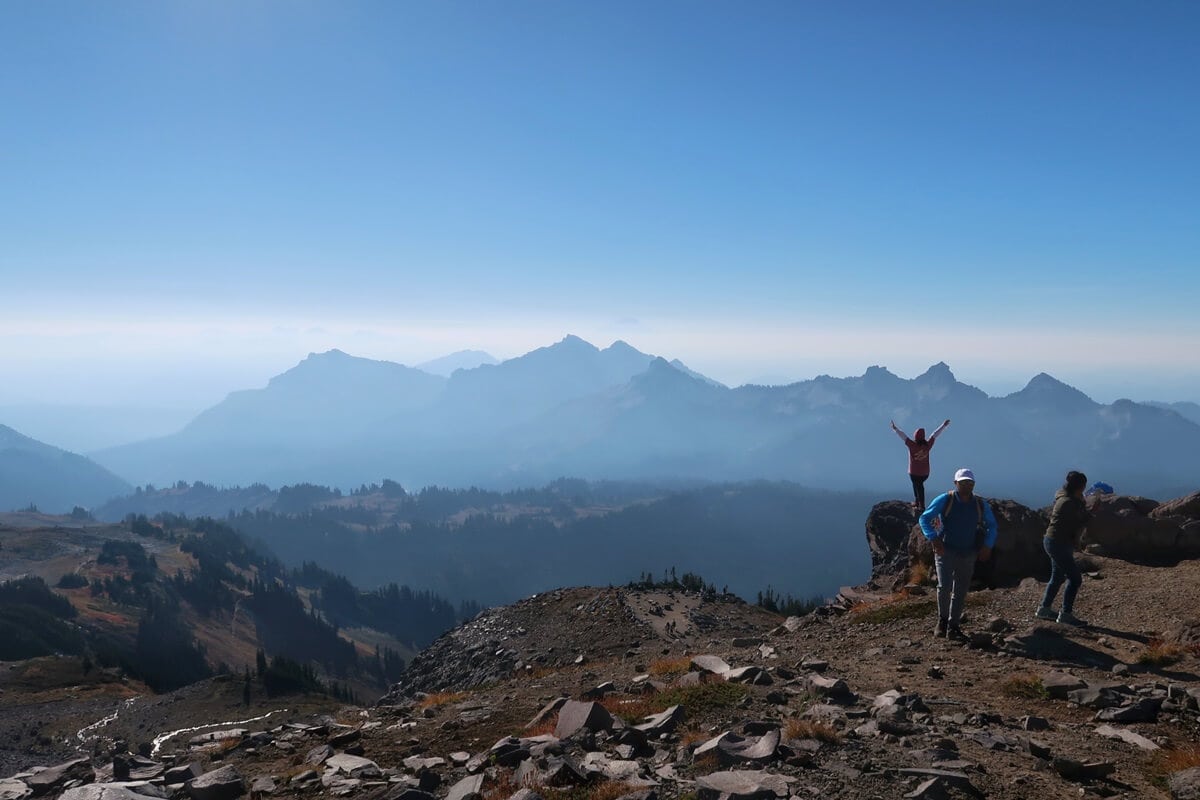
Always exercise caution and good judgment when taking photos. Standing on narrow rocks or too close to the edge of a rocky ledge is incredibly dangerous behavior.
Past Panorama Point, you’ll continue on the High Skyline Trail (called the Upper Skyline Trail on AllTrails), which connects with the Skyline Trail.
7. Edith Creek & Myrtle Falls
Edith Creek and Myrtle Falls are two of Paradise’s most iconic destinations. Photos of both stunning water features showcase Mount Rainier as an impressive backdrop.
Edith Creek feeds Myrtle Falls and is directly on the trail, while Myrtle Falls requires a short hike down an off-shoot trail to a viewing area where you’ll enjoy an unobstructed view of the 60-foot waterfall.

Expect crowds if you arrive here in the afternoon, but people are generally respectful and keep visits brief to keep the foot traffic moving through the viewing area.
If you’re short on time or prefer a shorter hike, the Skyline Trail to Edith Creek and Myrtle Falls makes an excellent standalone adventure, and if you arrive before 9:30am, the area’s much less congested.
When I hiked here with my 70-year-old parents, we arrived early on a Saturday in July and had Myrtle Falls entirely to ourselves briefly during the park’s busiest season.
8. Trail Versatility: Extend or Shorten Your Adventure
With so many intersecting and spur trails, you can choose your adventure based on your available time and your mobility and fitness level.
Extend Your Adventure
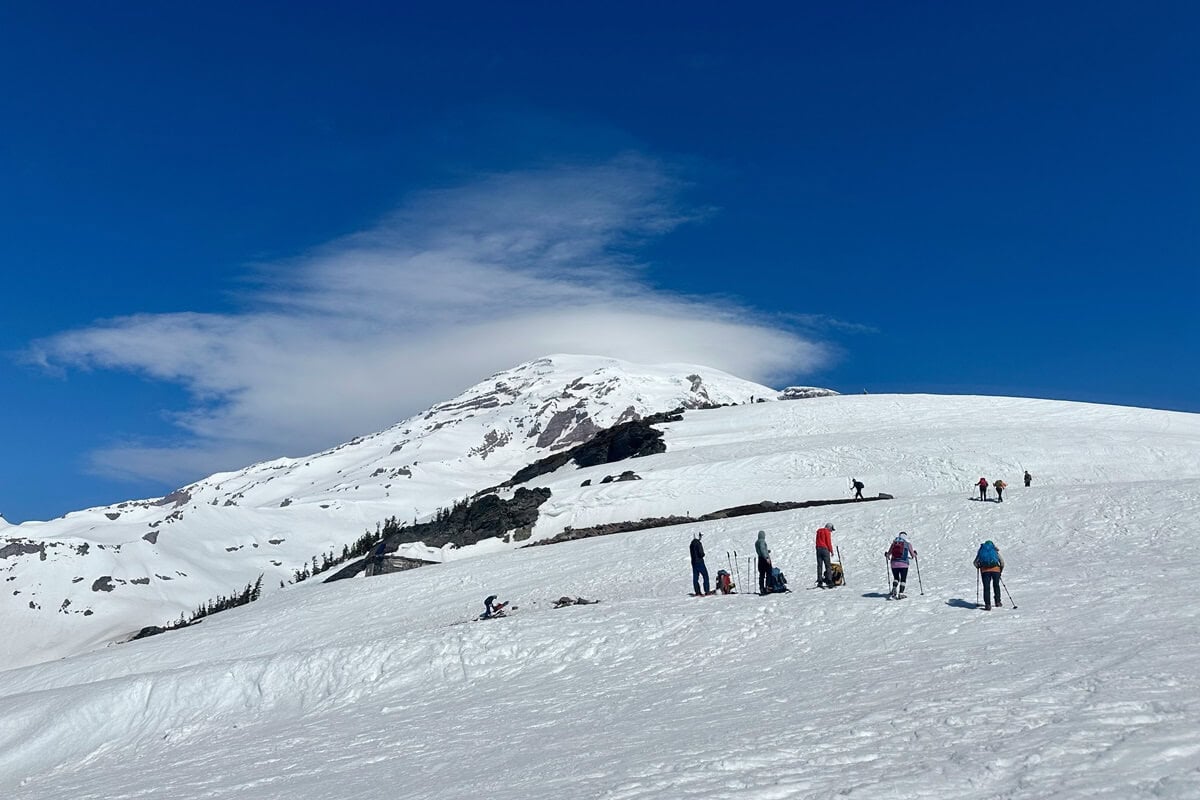
I love hiking to Camp Muir, the base camp for summit attempts, a challenge only for experienced and prepared adventurers with the proper gear and navigation skills. Even getting onto the Muir Snowfield to catch elevated volcano views is worthwhile.
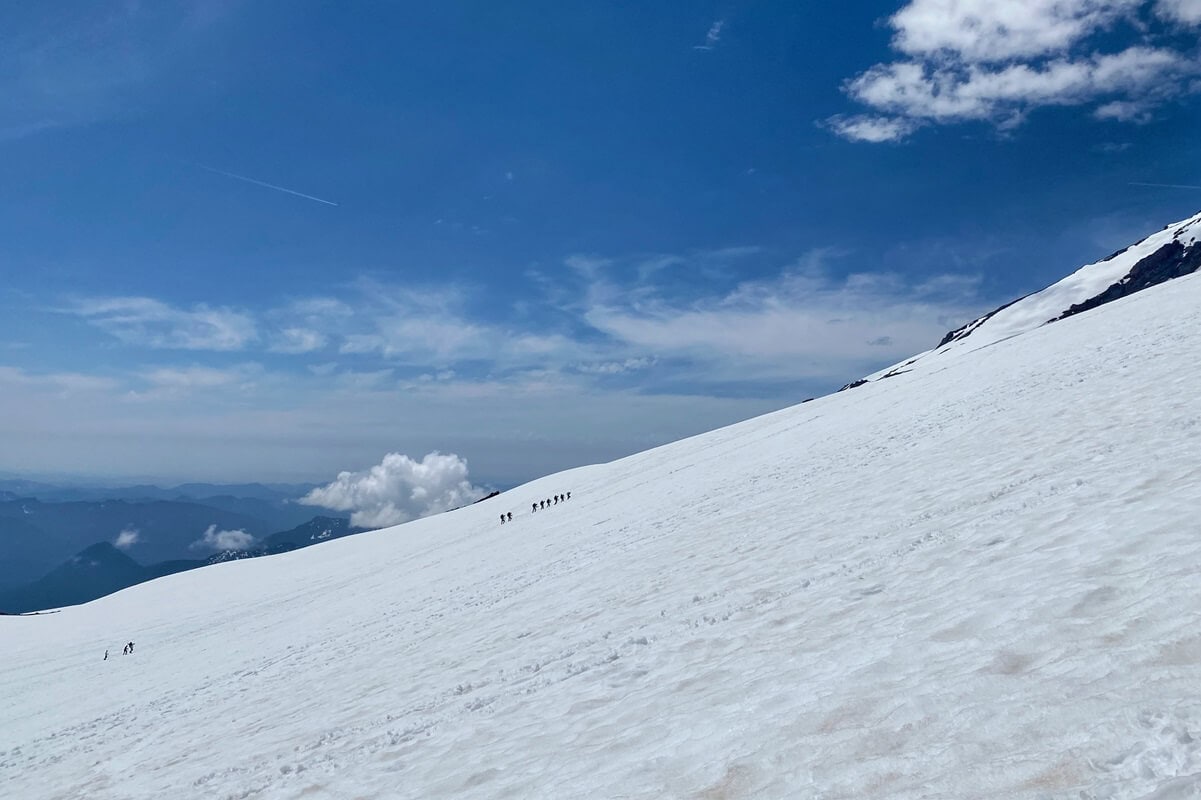
To do either, break off the Skyline Trail toward Pebble Creek before you reach Panorama Point.
Another option is to branch off onto the Paradise Glacier Trail, the end of which once featured ice caves before they melted due to climate change. It offers a chance to explore a less-traveled part of Paradise and check out Rainier’s eastern glaciers.
Shorten Your Adventure
If you’re looking to cut your loop hike short, at about 3.1 miles, you can hike the Golden Gate Trail back to Paradise. This route shaves over a mile off the loop and still takes you past Edith Creek and Myrtle Falls on the way back to the visitor center.
Is it worth doing the entire Skyline Loop?
You don’t need to do the entire loop if time is limited. But taking the Golden Gate Trail means missing out on another gorgeous water feature—one that you can get close to—when crossing the Paradise River a second time, along with some of Paradise’s best rolling meadows.
The stretch between Paradise River and Edith Creek feels like the hike’s grand finale when hiking clockwise. I move at a glacier’s pace through this section, captivated by the expansiveness of the meadows, especially when wildflowers or fall foliage blanket the landscape.
Hike to Panorama Point
Many choose to hike the Skyline Trail to Panorama Point as an out-and-back hike, just under 4 miles and 1,325 feet of elevation gain. This route is available year-round, weather permitting, for experienced adventurers with proper gear.
An alternative to the Skyline Loop with similar terrain and views is the Dead Horse Creek Trail and Golden Gate Loop.
Looking for another iconic Washington day hike?
The Maple Pass Loop Trail is one of my favorites in the North Cascades.
9. Amenities at Paradise
Before and after Paradise hikes, I take advantage of the area’s amenities, which are more plentiful than any other area in Mount Rainier National Park.
Bathrooms
There are two main public bathrooms: one near the Paradise Ranger Station, which opens early, and another at the Henry M Jackson Visitor Center. If you arrive early, only the ranger station bathrooms may be open.
Be prepared to wait in line.
You can also use the bathrooms inside Paradise Inn, even if you’re not staying there.
Food Options
Paradise offers three dining options:
- Paradise Camp Deli (inside the visitor center): Opens at 11am and serves snacks, pizza, and BBQ. I paid $9.50 for a hot dog last summer, but the convenience was worth it after a long hike.
- Tatoosh Cafe: If you didn’t have time to grab a sandwich or bagel before your hike, you can pick one up here. The outdoor seating area is a great spot to enjoy a celebratory post-hike beer.
- Paradise Inn Restaurant: This sit-down restaurant offers a more refined dining experience and is the most expensive option. But after a long hike, you’ve earned their $30 prime rib sandwich!

Lounging Areas
Take advantage of the many spots to rest and recharge:
- Picnic tables outside the visitor center are perfect for enjoying snacks or meals.
- Inside the visitor center, you’ll find couches to cool off and relax.
- Paradise Inn also has cozy seating areas perfect for unwinding after your hike.
10. Ideal for All Seasons
The Skyline Trail is an incredible experience every season as long as you know what to expect.
Spring
Spring conditions are much like winter, with the trail remaining snow-covered. While the entire loop isn’t accessible, you can still hike or snowshoe to Panorama Point to see the Tatoosh Range, Mount Adams, and Mount St Helens covered in snow.
Bring winter gear, including extra layers, navigation tools, and other safety essentials.
If you’re experienced and properly equipped, the hike to Camp Muir, starting and ending on the Skyline Trail, is an excellent spring training hike. It’s an annual adventure I rely on to prepare for bigger mountaineering challenges later in the year.
Summer
By mid-July, Paradise trails are generally clear of snow, and the meadows come alive with wildflowers and mountain heather in full bloom.
Summer is the park’s busiest season, so arrive early to beat the crowds, especially at Paradise.
Fall
Fall transforms the landscape into a stunning palette of reds, yellows, and oranges. The first time I saw the Paradise meadows ablaze in the fall, I was amazed by the sheer volume of fiery color.
Cooler temperatures and fewer tourists make fall one of the best times to hike at Mount Rainier.
Winter
In winter, the Skyline Trail transforms into a snowy wonderland for hikers and snowshoers. Bring proper snow gear, check weather reports, and talk with a ranger before setting out.
You can still reach Panorama Point, but choose a clear day for good visibility. Foggy conditions make the trail dangerous.
Tips for Hiking at Mount Rainier
What to Bring on the Trail
While the Skyline Trail is not a technical climb, it’s a serious hike through subalpine environments with significant elevation gain and varied terrain. Showing up prepared can make or break your experience.
I’ve created a checklist for Mount Rainier hiking, but below are five essentials to bring:
1. Sun Protection
This includes three critical items:
- Sun Hat and Sunglasses: I wear both. A sun hat is essential, and sunglasses are necessary for high UV conditions like the Muir Snowfield.
- Sunscreen: No matter the weather or season, sunscreen is mandatory. I wear sun hoodies so I don’t need sunscreen for my arms or chest.
2. Sturdy Shoes
The trail’s rocky terrain requires reliable footwear with good tread. I prefer hiking boots with ankle support, though some hikers opt for trail runners. Leave the Crocs in the car for after the hike!
3. Foot Care
Bring moleskin or bandages in your first aid kit. Don’t hike through discomfort! Stop and address hot spots immediately to avoid blisters.
4. Trekking Poles
I always hike with trekking poles. They reduce strain on my knees during steep descents and help with balance on gravelly paths.
5. Food & Water
This 3-4 hour hike is a workout. Start fully nourished and eat small snacks to maintain your energy levels.
I usually eat salmon or beef jerky for lunch and use a 3-liter water bladder to sip from the hose as I hike. I also drop electrolyte tablets into my Nalgene water bottle to stay hydrated.
The Ten Essentials
Finally, don’t hike the Skyline Trail without the Ten Essentials in your backpack. These basic safety items are non-negotiable for most hikes at Mount Rainier.
How to Avoid Crowds
Summer at Paradise means crowds are inevitable, but they’re much more manageable with a few smart strategies.
- Hike Counter-Clockwise in the Afternoon: If you’re starting mid to late afternoon, hiking the Skyline Trail counter-clockwise can help you avoid the busiest sections of the trail, as you’ll begin on less congested paths.
- Plan for Weekdays: Hiking on a weekday, ideally Monday through Thursday, significantly reduces the number of people you’ll encounter compared to weekends.
- Start Early on Weekends: If weekends are your only option, aim to hit the trail well before 8am. An early start means cooler temperatures and quieter trails.
Check out my guide to avoiding and managing crowds at Mount Rainier for more tips.
Roads & Parking Tips for Paradise
Check the status of Rainier’s roads before you head out, especially in spring, fall, and winter when snow can cause closures.
Stevens Canyon Entrance
In peak season, consider entering through the Stevens Canyon Entrance and taking Stevens Canyon Road to Paradise to avoid the long lines that form at the Nisqually Entrance.
Stay in Packwood to use the Stevens Canyon Entrance. It’s farther from Paradise than Ashford, but is a more convenient town if you plan to visit both Paradise and Sunrise.
During summer weekends, the main upper parking lot is often full by 7:30am, so arrive early. The second lot is on your left as you drive in and starts filling up by 8:30am, even with Timed Entry Reservations in place.
The park opens a third lot, and once that’s full, people start parking along Paradise Road.
Weather & Trail Conditions
Shoulder season weather is unpredictable and often winter-like. Check the NPS website for updates before your trip.
Even in summer, mountain weather can change rapidly. Rain is common in early June and occasionally occurs in July and August. Snow often lingers on the trail well into August, making sturdy shoes with good tread essential.
I check the Mountain Forecast website before every trip. It’s an excellent resource for checking the weather at different elevations.
I read trip reports before every hike to hear insights from other hikers on current trail conditions and gear recommendations.
Always bring extra layers, even in good weather, in case you’re on the trail for longer than expected.
Why You Should Hike Mount Rainier’s Skyline Loop Trail
Completing the entire Skyline Loop offers a range of Mount Rainier’s stunning scenery—up-close glaciers, expansive meadows, and high-elevation panoramic viewpoints—all in one unforgettable day hike that’s Washington’s best.
While it’s a strenuous hike, beginners can tackle it with the proper gear, including sturdy footwear, navigation tools, water, food, and other essentials. I was a beginner the first time I hiked this trail, and it’s the reason I fell in love with Paradise.
If you’re planning your first visit to Paradise, grab my free Paradise Quick-Start Guide to help you make the most of your day.
RELATED TRIP PLANNING POSTS:
➥ How to Visit Mount Rainier & Plan the Perfect Trip Length
➥ Best Time to Visit Mount Rainier: Will the Mountain Be Out?
➥ 17 BEST Things to Do at Mount Rainier (Non-Hikers Too!)
➥ 7 BEST Towns Near Mount Rainier for First-Time Visitors
➥ 15 BEST Places to Stay Near Mount Rainier (& Places to Skip!)
➥ National Park Inn Review: Pros, Cons & Why I’d Return
➥ A First-Timer’s Guide to Paradise at Mt Rainier (Hikes & Attractions)
➥ Longmire Mount Rainier: What to Do, When to Visit & Why It’s Worth It
➥ Mount Rainier 1-Day Itinerary (Best Hikes & Stops)
➥ Skyline Loop Trail Guide: 10 Reasons It’s WA’s Best Day Hike
➥ 10 Tips to Avoid Crowds at Mount Rainier in Peak Season